What does it mean when your computer shuts down unexpectedly, and when you try to reboot it, it displays a CPU fan error message? The CPU fan error occurs when your computer’s system detects that one or more of your CPU cooling fans is not working properly or at all. This causes the system to overheat, putting your CPU at the risk of damage.
While this unexpected shutdown can be annoying, it serves to protect your computer’s motherboard components from damage. It is actually an indication that your system’s defenses are up, and you won’t lose your data as a result of an error in the cooling of your device.
The CPU fan error will render your computer useless and this is why it is important to understand what causes it and how you can fix it. This is what we’ll be handling here, and by the end of this articles, you should be in a position to comfortably handle this error.

In this post we will cover:
- What Is The Cause Of The CPU Fan Error?
- What Does The CPU Fan Error Message Look Like?
- How To Fix CPU Fan Error?
What Is The Cause Of The CPU Fan Error?
The CPU fan error is quite a common error that can be attributed to both hardware and software issues.
Hardware Issues
- Object hindrance: There could be an object, say an entangled cable, which is physically preventing the blades of the fan from spinning.
- Fan blades mechanically damaged: If you accidentally bump your PC, the force of impact can break the blades of the fan. In spite of the fan spinning normally, it will not have the ability to cool your device.
- Faulty connection: If you have just built your PC or taken it apart to install some hardware, chances are that you may miss to correctly plug in the CPU fan to the CPU_FAN header. As a result, the system will recognize that the CPU_FAN header is not connected, and the protection will be activated, resulting in the CPU fan error message when the system boots up.
- Dust buildup: If you haven’t cleaned your device in a while, the dust could build up and prevent the fan(s) from spinning effectively.
RELATED: Motherboard Components – A Guide To Building Your Own PC
Software Issues
- Overclocking: If you’re a computer hardware enthusiast, you have probably explored overclocking to draw every ounce of performance from the CPU. Increasing the CPU’s clock speed beyond the value intended by the manufacturer causes it to have very high cooling demands. Your cooling system may not have the capacity to handle these demands leading to overheating and fan errors.
- Incorrect setting in BIOS: Before getting the fan error, did you accidentally open BIOS during startup and changed a setting you quite understand? You could have changed the default RPM value limit for your fan, causing it to slow down and even stop at low temperature. This can prevent your computer’s motherboard from detecting the fan, even when it is perfectly functioning.
Note that, since it is possible to have a perfectly functioning fan, but the motherboard fails to detect it. Consequently, you should first rule out the incorrect BIOS settings before proceeding to hardware fixes.
What Does The CPU Fan Error Message Look Like?
If there is a problem with the CPU fan, the Power-on self-test (POST) screen will report the CPU fan error when you boot up the computer. The CPU fan error message will differ depending on the BIOS variants of different manufacturers, as shown in the examples below:
- “Error: CPU Fan has failed”
- “CPU fan error, Please check !”
- “CPU fan speed error detected.”
- “System Fan (90B)”
- “CPU Fan Error !”
All of these basically mean one thing: your motherboard does not detect a working cooling device for your CPU. Here is how you can fix this.
How To Fix CPU Fan Error?
Set A Lower Limit For Your CPU Fan Speed
Motherboard manufacturers are currently releasing motherboards with 4-pin fan headers for PWM fans. These allow fan speed to be regulated by signals from the BIOS or OS.
This fix is supposed to rectify the CPU fan not working at the required RPM. This could be a result of modified settings in the BIOS accidentally or on purpose. Some brands like the ASUS motherboard, will issue a warning if the fan is underperforming considering its RPM. However, motherboards from other brands may not offer the same luxury. To fix this:
- Reboot your device and press either the F1, F10, or Delete key upon startup to get into BIOS.
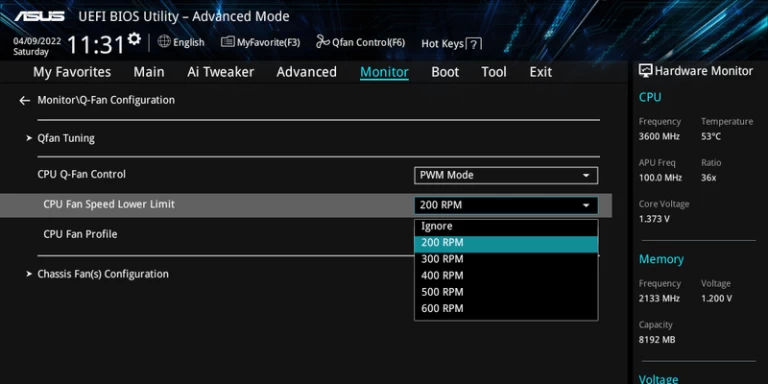
- Navigate to Advanced Mode>Monitor>Q-fan Configuration>CPU Q-fan Control>CPU Fan Speed Lower Limit on the BIOS utility window. Note that, this page may differ across different motherboard brands.
- Find the setting responsible for issuing RPM alerts. The default RPM value is usually 600.
- Lower this value to 200 and use the F10 key to save.
- Exit the BIOS and allow your system to boot.

Disable CPU Fan Speed Monitoring
Instead of going through the hassle of setting a lower RPM for your CPU fan, you can disable this alarm completely. The method below works best for ASUS and American Megatrends motherboards. To do this follow these steps:
- Press the F1, F10, or Delete key upon startup to get into BIOS.
- Navigate to the Advanced Mode in the BIOS utility.
- Click on the Monitor tab and find the CPU Fan Speed setting.
- Click on this setting and select Ignore.
- Use the F10 key to save and exit the BIOS.
Update BIOS Version
Outdated BIOS versions are often the main cause for the errors generated in some motherboards such as ASUS and Megatrends. In this case, all you have to do is update it to the latest version and the error will be fixed.
Suppose these software fixes haven’t worked for you, we recommend that you move to the hardware solutions.
Check For Object Hindrances And Damaged Blades
Open your PC’s case and locate the CPU fan. Check whether there is an object, such as entangled wires, that is preventing the blades from spinning. If you find it, carefully remove the object. You can also check if all the fan’s blades are intact. If the CPU fan has broken or bent blades, you should consider replacing it.
Clean The CPU Fan
Here, you’ll have to open the case and remove the CPU fan to clean off the dust that has accumulated on it. You could use a dry piece of cotton wool or one dipped in isopropyl alcohol (or another appropriate organic solvent) to gently wipe off the dust from each blade. A damp piece of cotton wool is necessary if the device is frequently used in the presence of cigarette smoke.
The safest way to clean a CPU fan is by using compressed air. Under no circumstances should you use water, unless you’re okay with damaging the motherboard (I’m guessing not!). After cleaning you have to make sure to connect everything back properly.
Ensure Your Fan Is Properly Connected
If there isn’t a fan connected to the CPU_FAN header, or it is not properly connected, your PC will shut down unexpectedly and display the CPU fan error message. To ensure that this is not the case, carefully open the PC case and check if the CPU fan is properly connected to the only to the CPU_FAN header.
It doesn’t matter if you’re using a liquid or air cooling system, ensure that it is not connected to other headers such as CHA_FAN or CPU_OPT, instead of the CPU_FAN. If you have verified this, you can close the case and restart your PC to see if you’re still getting this error.
RELATED: CPU FAN vs CPU OPT Fan Headers
Try Connecting To Alternative Headers
Some motherboards have multiple alternative fan headers, for example CPU_FAN 1, CPU_FAN 2 or SYS_FAN 1&2. You can utilize these alternative headers when one does not work.
Restore Your Device’s Clock Speed To Default Values
If you constantly get CPU fan error messages after overclocking your device, it means your cooling system is unable to handle the new cooling demands. You need to reset the clock speed to the default values. To do this:
- Boot your compute and press the F1, F10, or Delete key upon startup to get into BIOS.
- Restores the CPU’s previous setting values, returning them to their default values.
- Use the F10 key to save these changes and exit the BIOS.
Replace The CPU Fan
If you have tried all of these fixes and none of them have worked for you, the problem may be beyond fixing. In this case, we recommend that you get a new fan to replace the one you have installed. If the warranty is still active, you can contact your vendor for a free-of-charge replacement.
Wrapping Up
CPU fan error is a very common error that occurs when your computer detects that the CPU fan is not working properly to cool the system. Fortunately, you can fix this error yourself by determining the cause and applying the measures suggested on this post. However, if you are unable to resolve this issue or are unsure whether you can, we recommend that you seek the assistance of a professional.


